Preparing for Sod Installation – New Lush Lawn
Before embarking on the exciting journey of installing sod, it is important to properly prepare your landscape. Taking the time to prepare the ground adequately will ensure that your sod has the best chance of thriving and creating a lush green lawn. So, let’s explore some key steps to consider when preparing your landscape for sod installation. And if you need expert installation, Clean Cut Landscape Co. will be here ready to help.
Imagine you have a bare patch of land in your backyard that you’ve always dreamed of transforming into a beautiful lawn. To achieve this, you need to start by clearing the area of any existing vegetation, rocks, or debris. This will provide a clean canvas for your new turf.
Next, it’s essential to evaluate the overall drainage of your landscape. Poor drainage can lead to waterlogging and may hinder the healthy growth of your new lawn. Take note of any low-lying areas where water tends to accumulate and plan accordingly.
Now comes the crucial step of measuring and mapping out your lawn area. By accurately measuring the dimensions of the space, you can determine how much sod you will need to order. Be sure to include any irregular features such as trees or flowerbeds in your measurements.

With a clear understanding of your lawn area, it’s time to move on to analyzing the soil and leveling the ground. These steps are vital for creating an optimal environment for your new sod to flourish.
- Proper preparation is crucial for successful sod installation and creating a lush green lawn. Start by clearing the area of any vegetation, rocks, or debris to provide a clean canvas. Evaluate the drainage of your landscape and address any low-lying areas where water tends to accumulate. Measure and map out your lawn area accurately to determine how much sod you will need. Analyze the soil and level the ground to create an optimal environment for your new sod to flourish.
Analyzing the Soil and Leveling the Ground
The quality and composition of your soil play a significant role in determining the success of your sod installation. Analyzing these factors is essential before proceeding further. Start by obtaining a soil test kit or consulting a professional who can assess the pH level, nutrient content, and texture of your soil.
For instance, let’s say your soil test reveals that it has a high clay content, which could lead to poor drainage and compaction issues. In this case, you may need to amend the soil with organic matter such as compost or peat moss to improve its overall structure.
Once you have addressed any soil imbalances, it’s time to level the ground. Use a rake or shovel to remove any high spots and fill in low areas. Aim for a smooth and even surface, as this will ensure uniformity during sod installation.
Now that you have determined the necessary soil amendments and leveled the ground, you are well-prepared to move forward with the exciting process of installing your new sod. Remember, proper preparation is the foundation for a vibrant and healthy lawn.
Creating Furrows for Irrigation
When it comes to sod installation and ensuring a healthy, thriving lawn, proper irrigation is essential. One of the key steps in achieving effective irrigation is creating furrows or channels that allow water to flow evenly throughout the lawn. These furrows act as conduits, guiding water to reach the roots of the newly installed sod and promoting its growth.
First and foremost, you want to determine the layout and pattern of the furrows based on your lawn’s topography and drainage needs. It’s crucial to consider factors such as slope and existing landscape features to ensure an optimal irrigation system. For instance, if your lawn has a slight incline, creating swales or shallow channels along the contour can help prevent water runoff.
Imagine you have a gently sloping backyard that frequently experiences pooling after heavy rainstorms. By strategically designing furrows along the slope and connecting them to an appropriate drainage system, you can effectively redirect excess water away from your lawn, preventing damage caused by standing water.
Next, prepare the soil for furrow installation by thoroughly tilling it to improve its moisture retention capacity and promote root growth. Once the soil is adequately prepared, use a garden hoe or shovel to dig furrows along the planned layout. The depth and width of these furrows should be deep enough to accommodate irrigation water but not so wide that they affect the structural stability of the sod.
Let’s say you’re installing sod in your front yard with a rectangular layout. You decide to create furrows parallel to each other at approximately 6 inches apart. Each furrow is about 4 inches deep and 4 inches wide; this allows sufficient space for water distribution while maintaining a stable surface on your lawn.
To further enhance the effectiveness of your irrigation system, consider adding perforated pipes or French drain systems within the furrows. These additions can help regulate water flow, prevent oversaturation, and distribute water evenly throughout your lawn.
Selecting Quality Sod Cuttings
Selecting the right sod cuttings is essential for achieving a lush and healthy lawn. When purchasing sod, there are several factors to consider that can significantly impact the success of your lawn installation.
First and foremost, choose a reputable supplier or nursery to ensure that you receive fresh and high-quality sod cuttings. Look for suppliers with a good reputation, positive customer reviews, and a proven track record in providing healthy and disease-free sod.
When inspecting potential sod options, pay close attention to the overall appearance and texture. Look for sod that has vibrant, uniform green coloration and feels dense under your touch. Avoid sod that shows signs of discoloration, dryness, or insect damage, as these can indicate poor quality and may struggle to establish properly once installed.
Additionally, consider the type of grass suitable for your climate and intended use. Different grass varieties have specific requirements in terms of sunlight exposure, soil type, and maintenance needs. It’s important to select sod cuttings that are well-suited to your local climate conditions to maximize their chances of successful establishment.
Lastly, don’t forget about the timing of your sod purchase. Ideally, you want to install fresh-cut sod as soon as possible after delivery or pickup from the supplier. The longer the sod remains without being installed, the higher the risk of its quality deteriorating. If you cannot install it immediately due to external factors like weather conditions or other project constraints, make sure to carefully store it in a cool, shaded area and keep it adequately moist.
Preference for Certified Grass Seeds
When it comes to achieving a lush green lawn through sod installation, the choice of grass seeds plays a crucial role. Opting for certified grass seeds ensures that you are starting with high-quality, disease-resistant, and genetically pure turf. These seeds have undergone rigorous testing and meet strict standards set by organizations such as the National Turfgrass Evaluation Program (NTEP).
The certification process involves extensive field trials to evaluate characteristics like color, density, drought resistance, disease resistance, and overall performance. By selecting certified grass seeds, you can have confidence in their ability to produce healthy and vibrant sod.
Certified grass seeds also have the advantage of uniformity. This means that your lawn will have consistent growth patterns and appearance throughout. Uniformity is particularly important if you desire a seamless and visually appealing landscape.
Furthermore, certified grass seeds offer higher germination rates compared to non-certified alternatives. This means that you have a greater chance of successful establishment when laying down your sod pieces. Improved germination translates into faster growth and overall better results.
For instance, imagine opting for non-certified grass seeds that are prone to diseases or inconsistent growth patterns. This could lead to an uneven lawn with patchy areas that require extensive maintenance and costly repairs.
Choosing certified grass seeds demonstrates your commitment to investing in the long-term health and beauty of your lawn. While they may come at a slightly higher price point, their exceptional quality ultimately pays off in terms of durability and visual appeal.
Installing Sod Pieces on Your Garden or Yard
Once you have chosen the right type of certified sod for your lawn, it’s time to start the installation process. Here are some key techniques and tips to ensure successful sod installation:
- Site Preparation: Begin by thoroughly preparing the site where the sod will be installed. This involves removing any existing vegetation, rocks, or debris. It’s essential to create a smooth and level surface for optimal sod growth.
- Soil Testing and Amendments: Conduct a soil test to determine the pH levels and nutrient content of your soil. Based on the results, you may need to make amendments like adding lime for acidity or fertilizer for nutrient deficiencies. This step helps create an ideal growing environment for the sod.
- Proper Moisture and Watering: Prior to sod installation, it’s important to ensure that the soil is moist but not overly saturated. This facilitates easy root establishment once the sod is laid down. After installation, water the sod deeply but infrequently to encourage deep root growth.
- Laying Sod Correctly: Start at one edge of the area and unroll your sod pieces, making sure they are tightly fitted together with no gaps. Stagger the joints in a brick-like pattern to create a seamless appearance. Use a sod cutter or sharp knife to trim around edges and obstacles.
- Tamping and Rolling: Once all the sod pieces are in place, use a lawn roller or tamper to firmly press them into the soil. This helps eliminate air pockets and ensures good contact between roots and soil.
- Proper Post-Installation Care: Following installation, provide adequate irrigation to promote root growth and establishment. Avoid heavy foot traffic on newly installed sod until it has firmly rooted in the soil.
Remember, proper installation techniques and post-installation care are crucial to achieve a healthy and vibrant lawn with your newly installed sod.
- According to a study conducted by the University of California’s Division of Agriculture and Natural Resources, covering 600 square feet with sod typically takes approximately 2 hours when done professionally.
- The same study produced evidence that properly installed and maintained sod can eliminate up to 90% of soil erosion in the covered area.
- The USDA asserts that an acre of turfgrass, like you’d get from sod, will absorb hundreds of pounds of fossil fuel pollution over a year, making it a scientifically sound method for environmental protection.
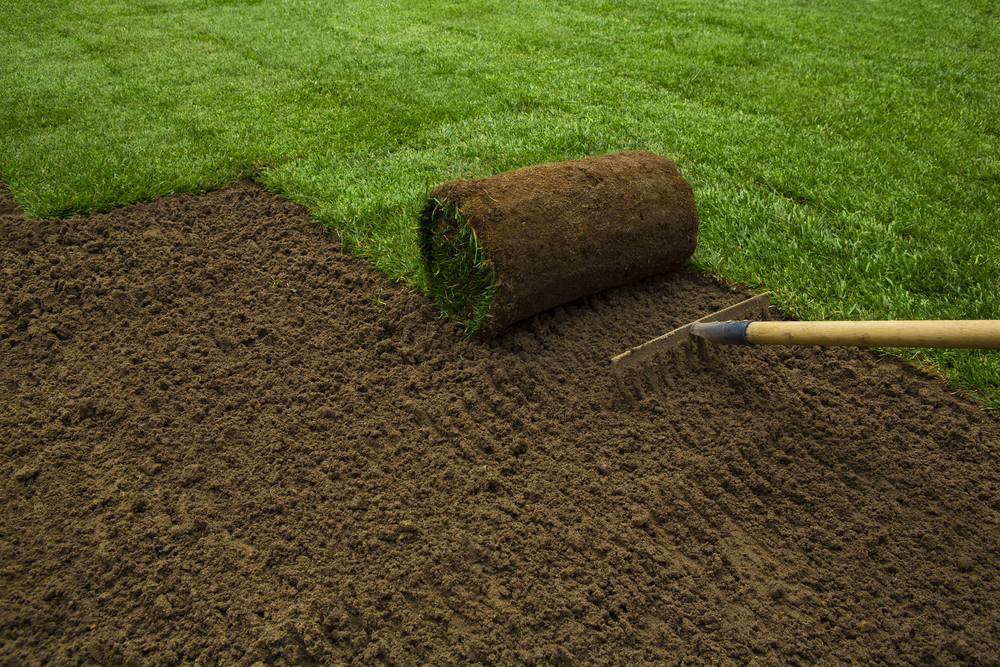
Wetting and Laying the Sod Cuttings
The process of laying sod cuttings is a crucial step in achieving a lush, green lawn. Before you start, make sure to prepare your soil by removing any debris, rocks, or weeds. Ensure the ground is level by filling in any low spots and grading it properly. Once your soil is adequately prepared, it’s time to wet and lay the sod cuttings.
First, thoroughly water the area where the sod will be installed. This step is essential as it helps moisten the soil and provides a better environment for root establishment. It also helps prevent the sod from drying out during the installation process.
Imagine you’re preparing to lay down your newly purchased rolls of sod. You start by sprinkling water over the prepared soil until it becomes thoroughly damp, but not soaked. This moisture creates an ideal bed for the sod to take root and establish itself.
Remember, do not water excessively as it can result in oversaturation and lead to other issues like poor drainage or fungal growth.
Next, begin laying the sod cuttings starting from a straight edge like a sidewalk or driveway. Place each piece tightly against its neighbor, avoiding any gaps that allow weeds or air pockets to form between them. Stagger the seams in a brick-like pattern to create stability and prevent visible lines.
Think of it as piecing together a puzzle; every piece should fit snugly with one another.
As you proceed, gently press down on each section of sod to ensure good contact with the soil underneath. Tamp it lightly with the back of a rake or your foot, being careful not to create unevenness or compact the soil excessively.
Taking care while installing each piece ensures that every bit is secure against the soil beneath.
Maintaining Your Newly Installed Sod
After the sod has been successfully laid, proper maintenance is crucial for its long-term health and establishment. Here are some essential tips to follow:
Let’s imagine you’ve just finished installing the sod in your backyard. It’s vibrant green and visually appealing. To keep it looking that way, you need to provide regular care and attention.
Watering Techniques:
- Watering is one of the most important aspects of maintaining newly installed sod. During the first few weeks, it’s essential to water deeply but infrequently, allowing the roots to establish themselves in the soil.
- Keep the sod moist by watering it every day or every other day, depending on weather conditions. Aim to provide about an inch of water each time to ensure proper hydration.
- As the sod starts to establish after a few weeks, you can gradually reduce the frequency of watering while increasing the amount of water applied during each session.
Mowing Techniques:
- Mow your newly installed sod when it reaches a recommended height of about 3 inches. Be sure not to remove more than one-third of the grass blade length at a time, as this can stress the turf.
- Regular mowing will help promote healthy growth and prevent weeds from taking hold in your lawn.
Fertilizing Techniques:
- Fertilize your new sod following manufacturer recommendations or consult with a professional landscaper for guidance on appropriate fertilizer types and application rates.
- Avoid over-fertilizing, as this can lead to excessive growth or damage to the grass.
Remember, consistency is key when it comes to maintaining your new sod. Establish a routine and follow these guidelines to ensure a healthy, lush green lawn.
Watering, Mowing, and Fertilizing Techniques
Maintaining a lush green lawn requires attention to several key factors: watering, mowing, and fertilizing. By following proper techniques for these essential tasks, you can ensure your sod installation flourishes and remains healthy throughout the seasons.
Watering is crucial for establishing new sod and maintaining its health. During the initial weeks after installation, it is important to keep the sod consistently moist to aid root development. Typically, this involves watering daily or every other day for the first two weeks, ensuring that the soil beneath the sod remains damp but not waterlogged. As the roots establish themselves, you can gradually reduce the frequency of watering while increasing the amount of water applied during each session. Deep watering is preferable over light surface sprinkling as it encourages deep root growth and strengthens the grass against drought conditions.
To determine if your lawn needs watering, perform a simple soil moisture test. Insert a screwdriver or a garden trowel into the ground. If it slides in easily and comes out with moist soil clumps attached, your lawn may not require immediate watering. However, if it comes out dry or with compacted soil clinging to it, it’s time to give your lawn a drink!
Next up, we have mowing, which plays a significant role in promoting healthy growth and maintaining an attractive appearance. Regular mowing helps stimulate lateral growth and encourages stronger root systems. When mowing newly installed sod, it’s essential to wait until the roots have fully established before cutting.
Let’s say you installed fresh sod two weeks ago, and now you’re ready to start mowing. Set your mower height to about 2.5 to 3 inches (6-8 cm) for most grass varieties. Aim to remove no more than one-third of the grass blade length at each mowing session to avoid stress on the plants. Mowing too low can weaken the grass, making it vulnerable to disease and weed invasion. Additionally, remember to keep your mower blades sharp to ensure clean cuts and prevent shredding or tearing of the grass.
Now that we’ve covered watering and mowing techniques, let’s move on to fertilizing, which is crucial for providing essential nutrients to the soil and promoting healthy growth in your lawn.
Fertilizing provides an extra boost of nutrients that may not be naturally present in your soil, aiding in the overall health and vibrancy of your turf. Before applying any fertilizer, it’s important to conduct a soil test to determine the nutrient needs of your lawn. This will help you choose the appropriate fertilizers and understand how often they should be applied.
Picture this: your soil test reveals a deficiency in nitrogen, one of the primary macronutrients needed for healthy plant growth. You select a fertilizer with a higher nitrogen content and apply it according to the recommended application rates. Over time, you’ll notice your lawn becoming greener and more vigorous as it receives the nutrients it requires.
It’s crucial to follow proper fertilization guidelines, applying the correct amount at the right time of year. Many experts recommend a slow-release or controlled-release fertilizer to provide a steady supply of nutrients over an extended period. Applying too much fertilizer or at improper times can lead to excessive growth, nutrient runoff, or even damage to the roots.
By following these watering, mowing, and fertilizing techniques, you can create optimal conditions for your newly installed sod or maintain a healthy existing lawn. Remember that each landscape is unique, so adjust these techniques based on regional climate, grass type, and specific needs of your lawn. With proper care and attention, you can achieve a lush green lawn that enhances the beauty of your outdoor space.