A flawlessly verdant lawn not only enhances the aesthetic appeal of your home but also contributes significantly to its market value. Achieving this picturesque landscape often starts with a proper sod installation and yard grading, essential for both water management and soil erosion prevention. Being a non-negotiable component in lawn setup, these procedures can be daunting especially if you lack experience. In this comprehensive guide, we delve deeper into everything you need to know about sod installation and grading to help you attain that dreamy, Instagram-worthy lawn – no green thumb needed! Stick with us and we promise your neighbors will have lawn envy in no time flat.
Sod installation grading is the process of preparing the ground for a new lawn by leveling and smoothing out the soil. This ensures that water will drain properly, so your new sod takes root and thrives. Proper preparation is crucial to maintaining a healthy, lush lawn for years to come. Our team at Clean Cut Landscape Co. has years of experience in this process and can provide expert advice on the best practices for your lawn.
Understanding Sod Installation and Grading
Transforming your lawn into a lush, green oasis is an exciting endeavor that can significantly enhance the appearance and value of your property. One crucial aspect of achieving a beautiful lawn is through sod installation and grading. Sod installation involves laying down pre-grown grass patches known as sod, providing an instant and visually appealing landscape. Grading, on the other hand, refers to the process of leveling the ground before sod installation. Understanding these two components is essential for ensuring the success of your lawn project.
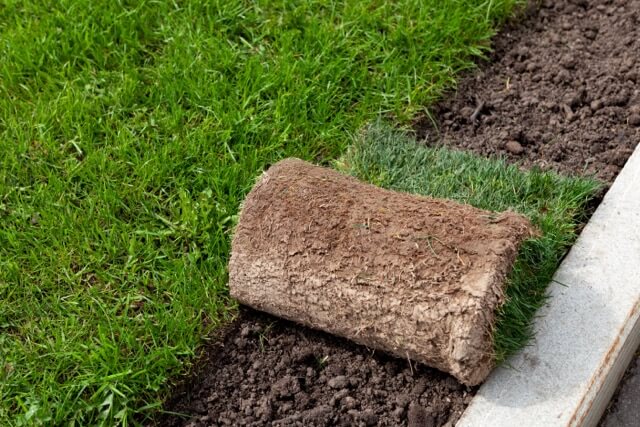
During sod installation, healthy strips or rolls of mature grass, complete with the root system, are carefully laid out over prepared soil. This technique offers immediate results compared to traditional seeding methods, which can take much longer to establish a full and vibrant lawn. Whether you have bare patches in your yard or want to transform an entire area quickly, sod installation can give you the desired outcome within a shorter timeframe.
Imagine hosting a backyard barbecue or garden party just weeks after installing sod, with your guests marveling at the lush green carpet beneath their feet.
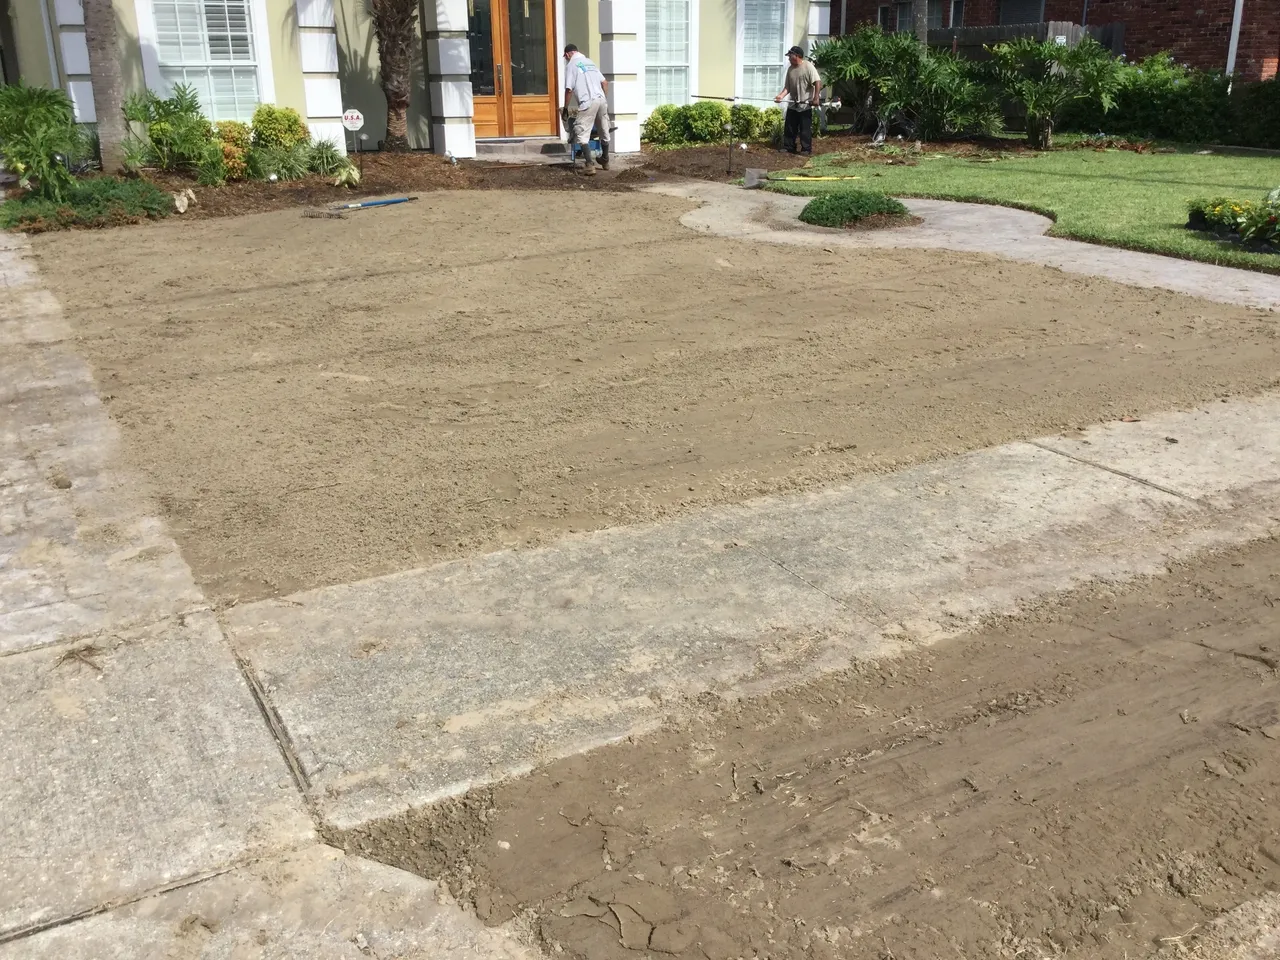
Before diving into the actual sod installation process, it’s important to address grading. Grading serves as the foundation for your new landscape and involves shaping and leveling the ground to ensure proper water drainage and a smooth, even surface. It involves removing any debris, rocks, or old grass and making necessary adjustments to slopes and contours for optimal water flow.
Key Components of Sod Installation Grading
The success of your sod installation heavily relies on effective grading. Here are some key components that play a vital role in ensuring optimal conditions for your new lawn:
- Drainage: Proper drainage is essential to prevent water accumulation on the surface, which can lead to soggy areas and damage to the roots. Grading helps create a slope that allows water to flow away from the lawn, preventing waterlogged patches.
- Leveling: Leveling the ground helps create an even surface for sod installation, ensuring a visually pleasing lawn. By eliminating bumps, valleys, and uneven areas, you can achieve a smooth finish that enhances both the aesthetics and functionality of your yard.
- Contouring: Contouring involves shaping the land based on its natural features and desired design. It helps create visual interest by adding gentle slopes or terraces while maintaining proper drainage patterns.
- Soil Preparation: As part of the grading process, the soil may need to be amended or conditioned to provide an optimal growing environment for the sod. This may involve removing poor-quality soil and replacing it with nutrient-rich topsoil or applying organic matter to improve soil structure.
By paying attention to these key components during grading for sod installation, you can lay a strong foundation for a healthy and thriving lawn. Whether you choose to tackle this project yourself or enlist professional help, understanding these aspects will ensure that your new lawn flourishes in its new environment.
The Importance of Grading in Sod Installation
When it comes to achieving a perfect lawn, grading plays a vital role in ensuring the success and longevity of your sod installation. Grading refers to the process of creating a smooth and level surface by carefully shaping the terrain before laying down the sod. This step is crucial as it provides a solid foundation for healthy and uniform growth of the turf.
Proper grading helps to address potential issues such as water drainage problems, uneven surfaces, and soil compaction. By carefully manipulating the land’s contours, grading ensures that water flows away from your home’s foundation, preventing pooling or flooding that can damage both your lawn and property. It also eliminates low spots or humps in the soil, creating an aesthetically pleasing and even surface for your new sod.
Achieving an accurately graded surface requires careful planning and attention to detail. Identifying any existing high or low spots on the ground is the first step. These irregularities may be caused by natural topography, previous construction work, or foot traffic patterns. Once identified, these areas need to be leveled out through precision grading techniques. This may involve adding or removing soil to create a harmonious slope that directs water flow away from structures and towards appropriate drainage points.
Grading is particularly crucial when dealing with heavy clay soils that tend to compact easily or in areas prone to excessive rainfall where proper drainage is essential. Without proper grading, water can accumulate in low-lying areas, leading to soggy spots on the lawn and potentially causing root rot or other plant health issues.
Imagine you’ve installed sod on uneven ground without proper grading. During heavy rainfall, water pools around certain areas while completely avoiding others. The pooling water creates muddy patches on your lawn while leaving other areas dry and parched. Not only does this ruin the overall appearance of your lawn, but it also compromises the health of the grass. By implementing proper grading techniques, you can ensure a more uniform distribution of water, resulting in a healthy and thriving lawn.
Steps to Prepare Soil for Sod Installation
Preparing the soil properly before laying down sod sets the stage for healthy root establishment and vigorous growth. The following steps will guide you through the process:
- Soil Assessment: Begin by assessing your existing soil conditions. Test the pH levels, nutrient content, and soil structure to determine if any amendments or adjustments are necessary. Understanding your soil’s composition will help you make informed decisions about potential fertilizers or organic matter additions.
- Remove Debris: Clear the area of any debris, such as rocks, roots, sticks, or old turf. These items can impede proper root growth and create an uneven surface.
- Till the Soil: Use a garden tiller or a similar tool to loosen compacted soil. Tilling improves soil aeration and drainage while allowing roots to penetrate deeper into the ground.
- Leveling: With the use of a rake and/or leveling board, smooth out any visible bumps or depressions in the soil. This step ensures an even surface for laying down the sod.
- Soil Amendments: Based on your soil assessment results, incorporate any necessary amendments such as compost, peat moss, or sand to improve texture, nutrient content, and moisture retention capacity.
- Final Raking: Give the prepared soil one final gentle raking to create a fine tilth—a loose and crumbly consistency—ideal for easy sod installation.
By following these steps diligently, you’re setting your lawn up for success from day one. Properly prepared soil creates an environment conducive to healthy root development and allows the sod to establish quickly, resulting in a lush and vibrant lawn.
Soil Assessment and Depth Requirements
Before diving into the process of sod installation, it’s essential to begin with a thorough soil assessment. Understanding the composition and quality of your soil is crucial for creating the ideal foundation for your lawn. Start by conducting a simple soil test to determine its pH level, nutrient content, and texture. This will provide valuable information about any amendments that may be necessary before installing sod.
The depth requirements for sod installation depend on various factors, including the type of grass and climate conditions. In general, it is recommended to have at least 4-6 inches of topsoil for optimal root development and moisture retention. However, it’s important to note that different types of grass may have specific depth requirements. For example, warm-season grasses like Bermuda or Zoysia may require deeper soil depths compared to cool-season grasses like Kentucky Bluegrass or Fescue.
It’s also important to consider any potential grading issues before installing sod. If your lawn has uneven terrain or poor drainage, it’s crucial to address these issues before laying down the sod. Poorly graded areas can lead to water pooling and uneven growth of the turf. Therefore, proper grading ensures a smooth and level surface for the sod to be installed.
Designing Your Lawn for Optimal Sod Installation
Designing your lawn layout before installing sod allows you to create an aesthetically pleasing and functional outdoor space. Consider factors such as sunlight exposure, traffic patterns, and desired activities when planning your lawn design.
Start by mapping out different zones based on sun patterns throughout the day. Determine areas where direct sunlight is abundant and where shade may occur due to trees or structures. This information will help you select the appropriate grass varieties that thrive in different light conditions.
For instance, if you have a heavily shaded area, you can choose shade-tolerant grass species like Fine Fescue or St. Augustine. On the other hand, for areas with full sun exposure, warm-season grasses such as Bermuda or Buffalo grass are excellent choices.
Additionally, consider the traffic patterns in your yard. Determine high-traffic areas where people walk or play frequently. To ensure durability and optimal performance of the sod, select grass varieties known for their ability to withstand heavy foot traffic and wear.
Just like designing the interior of your home, creating zones and considering functionality ensures that your lawn is enjoyable and suits your needs perfectly.
Once you’ve identified the various zones and selected the appropriate grass species for each area, it’s time to create a detailed layout plan. Take measurements of your yard and mark out boundaries for each zone accordingly. This will help estimate the amount of sod required and provide clarity during installation.
Some homeowners might opt to hire professional landscape designers or architects to assist them in designing their lawns. While this can be beneficial, especially for large or complex projects, it’s not always necessary. With careful planning and research, homeowners can successfully design their lawns for optimal sod installation.
With the soil assessed and depth requirements understood, and a well-designed lawn plan in place, we are now ready to move on to the step-by-step guide for sod installation.
Step-by-Step Guide to Sod Installation
Creating a lush and vibrant lawn can transform the aesthetics of your outdoor space. Sod installation offers a quick and efficient way to achieve a beautiful green carpet-like lawn. Here is a step-by-step guide to help you successfully install sod and create the perfect foundation for healthy grass growth.
- Prepare the soil: Before sod installation, it’s crucial to prepare the soil properly. Start by removing any existing grass, weeds, rocks, or debris from the area. Use a tiller or garden rake to loosen the topsoil and remove any compacted areas. It’s also essential to test the soil pH levels and make necessary amendments based on recommendations.
- Grade the area: Proper grading ensures water drainage and prevents uneven surfaces. Smooth out any bumps or hills in the soil using a garden rake or hand tamper. Aim for a gentle slope away from structures to avoid water pooling.
- Measure and order sod: Measure the area you want to cover accurately to determine the amount of sod required. Order fresh, high-quality sod from a reputable supplier that matches your specific grass type and climate.
- Water thoroughly: Before laying down the sod, it’s important to water the prepared soil adequately. Moisture is key for successful sod establishment, so soak the soil until it is moist but not saturated.
- Install the sod: Start by laying down the first row of sod along a straight edge, such as a sidewalk or driveway. Stagger subsequent rows like bricks, ensuring there are no gaps between them. Use a sharp knife or sod cutter to trim pieces as needed for edges or irregular shapes.
- Sod-to-soil contact: After placing each piece of sod, firmly press it down with your feet or use a lawn roller to ensure good contact with the soil beneath. This helps eliminate air pockets and promotes root penetration.
- Water and care: Immediately after sod installation, thoroughly water the entire area to settle the soil and promote root establishment. Keep the sod consistently moist for at least two weeks, watering deeply but infrequently to encourage deep root growth. Avoid foot traffic on the newly installed sod until it has firmly taken root.
- Maintenance: Regular maintenance is essential to nurture the newly installed sod. Follow a proper watering schedule, mow when required (usually after the roots have firmly established) and fertilize according to the recommended guidelines for your grass type.
By following these step-by-step instructions, you can ensure a successful sod installation process that will result in a lush, green lawn that enhances your outdoor space and adds value to your property.
Common Mistakes and Troubleshooting in Sod Installation
While sod installation can be a relatively straightforward process, there are some common mistakes that homeowners may make. Understanding these pitfalls and knowing how to troubleshoot them can prevent issues and lead to a successful outcome.
- Insufficient soil preparation: Failing to properly prepare the soil can hinder sod establishment. Compact or rocky soil should be loosened, and level grading is crucial for drainage and an even surface.
- Wrong sod choice: Choosing the wrong type of sod for your climate or not considering factors like shade tolerance or drought resistance can result in poor growth or damaged lawns. Research and consult with experts to select the right sod variety for your specific needs.
- Improper watering: Overwatering or underwatering can both be detrimental to newly installed sod. Too much water can lead to shallow root growth or diseases, while inadequate watering can cause dehydration and patchy growth. Follow recommended watering guidelines specific to your grass type.
- Inadequate soil-to-sod contact: Failing to firmly press down each piece of sod onto the prepared soil can create air pockets, hindering root establishment and leading to dead patches. Ensure good soil-to-sod contact by using a lawn roller or firmly pressing down each piece.
- Premature foot traffic: Walking or placing heavy objects on newly installed sod before it has firmly rooted can cause damage and disrupt the establishment process. Avoid any foot traffic until the grass has had sufficient time to develop strong roots.
- Neglecting maintenance: Proper maintenance after sod installation is crucial for long-term success. Neglecting regular watering, mowing, and fertilization can result in weak growth, yellowing, or disease susceptibility.
By being aware of these common mistakes and troubleshooting tips, you can avoid potential issues and ensure a smooth sod installation process that leads to a healthy and beautiful lawn.