How To Treat and Prevent Hydrangea Spots
Hydrangeas can develop spots on their leaves due to various reasons, including fungal or bacterial infections, nutrient deficiencies, insect infestations, or environmental factors. To determine the precise cause and implement appropriate treatment, it is advisable to consult a local horticulturist or garden expert who can assess the specific conditions of your hydrangea plants.
Identifying Causes of Hydrangea Spots
Hydrangeas, with their vibrant blooms and lush foliage, are beloved additions to many gardens. However, when unsightly spots appear on their leaves, it can be concerning. To effectively treat and prevent hydrangea spots, it is crucial to identify the underlying causes. Several factors can contribute to the development of these spots, including pests, diseases, environmental conditions, and improper care practices.
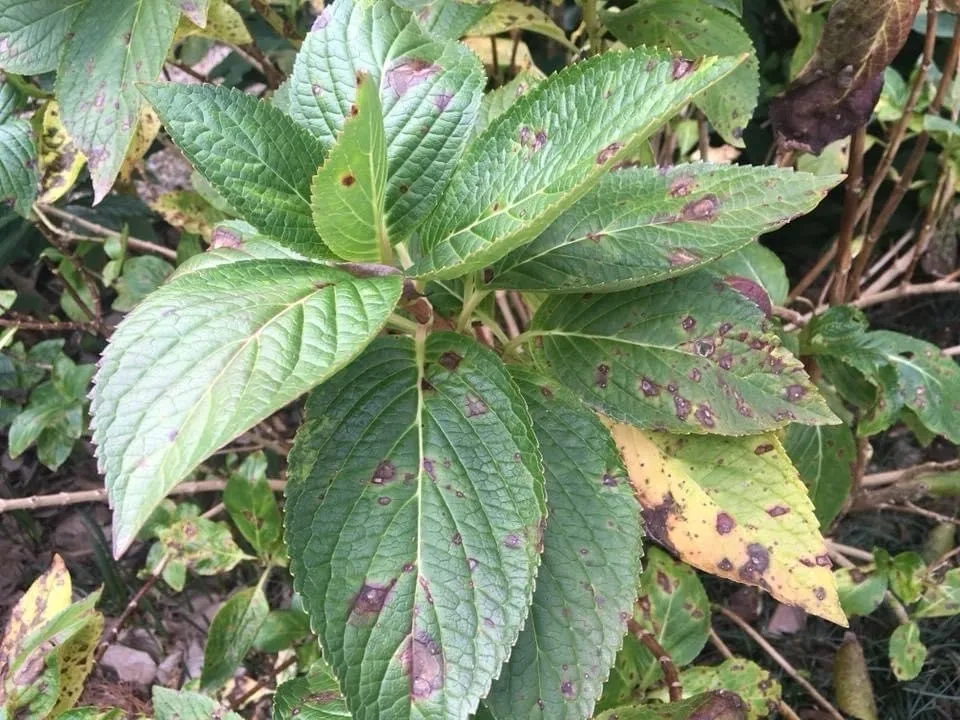
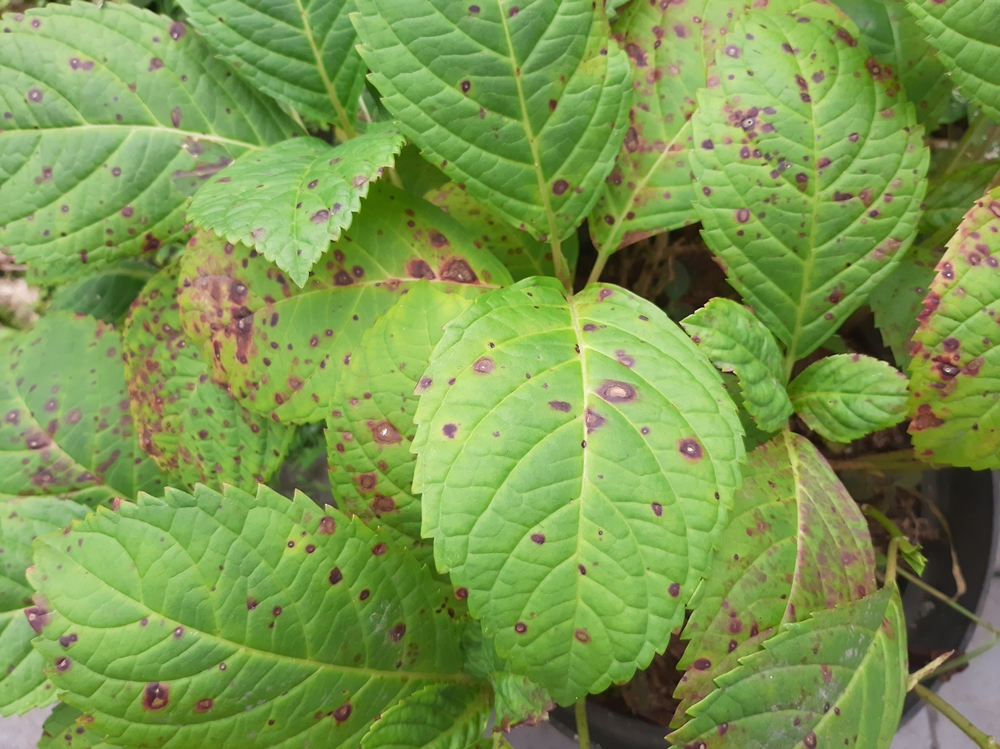
One common cause of hydrangea spots is fungal diseases. Leaf spot diseases such as Cercospora leaf spot, Anthracnose, and Septoria leaf spot can all manifest as spots on hydrangea leaves. These fungi thrive in warm and humid environments, especially during periods of frequent rainfall or overwatering. These diseases often begin as small spots that gradually enlarge and may have distinctive patterns or discoloration.
Another culprit behind hydrangea spots is bacterial infections. Bacterial leaf spot is caused by bacteria that enter through wounds or natural openings in the plant’s tissue. This can occur from improper pruning techniques or harsh environmental conditions that weaken the plant’s defenses. Bacterial leaf spot typically appears as water-soaked lesions that eventually turn dark brown or black.
In addition to diseases, pests and insects can also leave their mark on hydrangeas. Spider mites, aphids, and scale insects are known to feed on hydrangea foliage, causing damage that appears as tiny specks or discolored areas on the leaves. Additionally, some pests may secrete substances that further contribute to the development of spots.
Understanding the causes behind hydrangea spots is like playing detective in your garden. By carefully observing the appearance and patterns of the spots, you can gather valuable clues about what might be going wrong.
Identifying the specific cause of hydrangea spots may require a close examination of the leaves, stems, and overall plant health. Look for distinctive patterns, discoloration, or signs of pests. It can also be helpful to consult with a local horticulturist or extension office to get expert advice on common issues in your specific region.
Role of Environmental Factors
Hydrangeas are sensitive plants, and changes in environmental conditions can significantly impact their health and appearance. Understanding these factors can help prevent and alleviate hydrangea spots.
Light is a crucial environmental factor for hydrangeas. Insufficient sunlight can weaken the plant’s defenses and make it more susceptible to diseases and pests. On the other hand, excessive exposure to intense sunlight can cause leaf scorch, which may appear as browning or yellowing spots on the leaves.
Watering practices also play a significant role in preventing hydrangea spots. Overwatering can create a damp environment that promotes the growth of fungi and bacteria. It is important to maintain a consistent watering schedule, ensuring that the soil drains properly and doesn’t become waterlogged.
Temperature fluctuations can also contribute to hydrangea spot development. Hydrangeas thrive in moderate temperatures, and extreme highs or lows can stress the plant and weaken its immune system. This makes it more susceptible to diseases and pests.
It’s worth noting that different varieties of hydrangeas have varying levels of tolerance for certain environmental conditions. Some may be more prone to developing spots under specific circumstances, while others may be more resilient. Knowing your specific hydrangea variety can guide you in providing optimal growing conditions.
With an understanding of how environmental factors influence hydrangea spot development, it becomes evident that maintaining a healthy growing environment is essential for their prevention and treatment.
Impact of Pests and Insects
Hydrangeas, with their beautiful blooms and vibrant colors, are not immune to the challenges posed by pesky pests and insects. These unwelcome visitors can cause significant damage to the health and appearance of your hydrangea plants if not properly addressed. Aphids, for example, are tiny insects that feed on the sap of hydrangea leaves, leading to yellowing and distortion. Spider mites, on the other hand, leave behind webs and cause leaves to turn bronzed or speckled. Scale insects can also latch onto stems and leaves, sucking out vital nutrients.
The impact of these pests on your hydrangeas goes beyond mere cosmetic damage. They can weaken the overall health of the plant, making them more susceptible to diseases and other stressors. Additionally, aphids or spider mites can introduce viruses that further compromise the plants’ vitality. It is crucial to identify signs of pest infestation early on and take appropriate action to prevent further harm.
Addressing pest issues requires a multifaceted approach. Start by regularly inspecting your hydrangeas for any signs of infestation. Look for visible pests such as aphids or spider mites on the undersides of leaves or along stems. Keep an eye out for telltale signs like distorted or discolored foliage, webbing, or sticky residue left by scale insects.
If you notice an infestation, several control methods can be employed depending on the severity. For mild infestations, a simple blast of water from a hose can dislodge many pests like aphids or spider mites. In cases where natural predators are present in your garden, such as ladybugs or lacewings, they can assist in controlling the population of these harmful insects.
However, more severe infestations may require intervention through the use of insecticidal soaps or horticultural oils. These products are effective in controlling aphids, spider mites, and scale insects without posing significant harm to beneficial insects or the environment. Always follow the instructions provided by the manufacturer when using any pesticides.
Taking proactive steps to prevent pests from infesting your hydrangeas is also crucial. Maintaining overall plant health through proper watering, fertilizing, and regular pruning can help build a natural defense against pests and ensure their resilience. Additionally, promoting a diverse and balanced ecosystem in your garden can attract beneficial insects that prey on the pests targeting your hydrangeas.
While addressing pests is vital for maintaining healthy hydrangeas, another factor that can have a significant impact on their well-being is moisture and temperature imbalance.
Moisture and Temperature Imbalance
Hydrangeas require a delicate balance of moisture and temperature to thrive. Both excessive moisture and extreme fluctuations in temperature can spell trouble for these enchanting plants.
Moisture imbalance often manifests in the form of root rot, a common problem faced by many gardeners. This condition occurs when the roots of the hydrangea remain overly saturated for extended periods. Poor soil drainage, heavy rainfall, or improper watering practices can contribute to this issue.
When roots are deprived of oxygen due to excess moisture, it can result in root decay, stunted growth, yellowing leaves, and wilting. In severe cases, the entire plant may succumb to the effects of root rot.
On the other hand, inadequate moisture can lead to dehydration and stress for hydrangeas. During hot summer months or in arid climates, insufficient watering can cause wilting, leaf drop, and an overall decline in plant health. It is crucial to strike a balance between providing enough water to keep hydrangeas hydrated without drowning their roots.
Temperature fluctuations can also pose challenges for hydrangeas. These plants thrive in moderate temperatures and are susceptible to damage from both extreme cold and heat. Sudden drops in temperature during early frost or winter can cause damage to buds and lead to reduced flowering in the following season. Extreme heat, especially when combined with inadequate moisture, can result in wilting, leaf burn, and overall decline.
Picture this scenario: You live in an area with scorching summer temperatures, and your hydrangeas are showing signs of wilting and browning leaves. Upon further inspection, you notice that the soil is bone dry due to insufficient watering. This combined effect of heat stress and lack of moisture is taking a toll on your precious hydrangeas.
To prevent moisture imbalance, ensure that you plant hydrangeas in well-draining soil and provide adequate water without overdoing it. Mulching can also help retain moisture and regulate soil temperature.
In regions with harsh winters or unpredictable temperature fluctuations, consider providing protection to your hydrangeas by covering them with burlap or relocating potted plants indoors during extreme weather conditions.
Maintaining appropriate moisture levels and regulating temperature play crucial roles in ensuring the health and vitality of your hydrangeas. By implementing preventive measures, you can keep your plants thriving.
Preventive Measures for Spotless Hydrangeas
Hydrangeas are beloved flowering plants known for their beautiful blooms and lush foliage. However, they can be susceptible to unsightly spots on their leaves, diminishing their aesthetic appeal. To keep your hydrangeas spotless and vibrant, it’s essential to implement preventive measures. By following these steps, you can ensure that your hydrangeas remain healthy and free from common leaf spot diseases.
One of the key preventive measures is proper watering. Hydrangeas thrive in moist soil, but overwatering can lead to fungal diseases that cause leaf spots. It’s crucial to strike a balance between keeping the soil adequately hydrated and avoiding waterlogging. Regularly check the moisture levels in the soil and adjust your watering accordingly.
For instance, if you notice the soil feels dry when you insert your finger about an inch deep, it’s time to water your hydrangea plant. On the other hand, if the soil feels damp or muddy, hold off on watering until it has had a chance to dry out slightly.
Another preventive measure is ensuring good air circulation around your hydrangeas. Proper airflow helps prevent moisture buildup on the leaves, which can create an environment conducive to fungal growth. Avoid overcrowding your hydrangea plants by providing adequate spacing between each one in your garden or landscape design.
In addition to watering and air circulation, regular inspection and early detection are vital in preventing leaf spots on hydrangeas. Check your plants regularly for any signs of discoloration, lesions, or unusual growth patterns on the leaves. Should you notice any issues, promptly address them using appropriate treatments or consult with a professional horticulturist for guidance.
Choosing the Right Soil
When it comes to hydrangeas, selecting the right soil is paramount for their overall health and disease prevention. So, what kind of soil do hydrangeas prefer? Generally, hydrangeas thrive in well-draining soil that is rich in organic matter.
Ideally, a pH range between 5.5 and 6.5 is considered optimal for most hydrangea varieties. This slightly acidic to neutral pH helps ensure proper nutrient uptake and contributes to vibrant flower coloration. However, it’s important to note that some hydrangea species, like the blue or pink-flowering varieties, are sensitive to soil pH and can affect the intensity of their bloom colors.
To create the right soil conditions for your hydrangeas, amend the soil with organic matter such as compost or well-rotted manure. This improves drainage capabilities while also enriching the soil with essential nutrients. Organic matter helps retain moisture while preventing waterlogging, which can lead to root rot and nutrient deficiencies.
For example, consider incorporating compost into your planting hole or adding a layer of mulch around the base of your hydrangea plants. This will help regulate moisture levels in the soil and provide a steady supply of nutrients over time.
Moreover, understanding your specific hydrangea variety’s preferences is important when choosing the right soil composition. While most hydrangeas prefer moist but well-draining soil, certain species may have unique requirements. For instance, panicle hydrangeas (Hydrangea paniculata) are more adaptable to different soil conditions compared to mophead or lacecap hydrangeas (Hydrangea macrophylla). Researching your specific type of hydrangea will help you better tailor your soil preparation efforts.
Necessary Pruning and Fertilization
Proper pruning and fertilization practices are essential for maintaining the health and vigor of your hydrangea plants, contributing to their ability to resist and recover from spots and diseases. Understanding when and how to prune your hydrangeas will not only promote new growth but also help manage any existing issues with spotted leaves.
Pruning should be done at the appropriate time depending on the type of hydrangea you have. For mophead (H. macrophylla) and lacecap (H. macrophylla) hydrangeas, which are most susceptible to spots, it is recommended to prune in early spring just as new growth begins to emerge. This allows you to remove any dead or damaged wood, improve air circulation, and reduce overcrowding of branches, all of which can contribute to the development of fungal diseases.
Imagine you have a beautiful mophead hydrangea with spotted leaves. By observing that new growth is starting in early spring, you decide it’s time for some necessary pruning. Armed with sharp and clean pruning shears, you carefully inspect the plant and remove any dead or diseased branches. You also thin out some crowded areas within the shrub to allow better air circulation. This proactive approach helps minimize the risk of spreading or worsening leaf spots.
Fertilization plays a crucial role in ensuring that your hydrangeas receive adequate nutrients to maintain their overall health. A balanced fertilizer with equal proportions of nitrogen (N), phosphorus (P), and potassium (K) is generally recommended for healthy plant growth. However, excessive nitrogen can promote lush foliage growth that is more susceptible to spots, so be cautious not to overfertilize with nitrogen-rich products.
Timing is key when applying fertilizers to hydrangeas. In early spring, before new growth emerges, apply a slow-release granular fertilizer by sprinkling it around the base of the plant and gently working it into the soil. This provides a steady supply of nutrients throughout the growing season.
Therapeutic Methods for Spotted Hydrangea Leaves
If your hydrangea leaves are already spotted, it’s important to implement proper therapeutic methods to help alleviate the symptoms and promote recovery. While it may not be possible to completely rid your plants of spots once they have developed, careful treatment can prevent further spread and damage.
One effective method is to remove any infected leaves from the plant. Using clean gardening shears or scissors, carefully clip off the spotted leaves at their base, ensuring not to further damage healthy foliage. Dispose of the infected leaves in a sealed bag or trash to prevent recontamination.
Picture yourself in your garden, examining your beloved hydrangeas with spotted leaves. With a pair of sterile garden shears in hand, you carefully inspect each leaf, identifying the discolored and diseased ones. You snip them off at their base, methodically removing the affected foliage. This precise action helps reduce the source of infection and prevents further spreading to healthy parts of the plant.
Additionally, providing adequate air circulation around your hydrangea bushes can discourage fungal growth and help dry out wet foliage. Proper spacing between plants, removal of nearby vegetation that obstructs airflow, and strategic placement in well-ventilated areas can all contribute to minimizing moisture retention on leaves.
Just like we feel suffocated when confined in a stuffy room, so do our hydrangeas when surrounded by tightly-packed foliage. By giving them space to breathe freely and fresh air movement, we provide an environment where fungal spores struggle to thrive.
In cases where spot development is severe or recurrent, especially during periods of high humidity or excessive moisture, the use of antifungal sprays may be warranted. Consult with a horticulturist or garden center expert to identify an appropriate fungicide specifically labeled for hydrangea leaf spots and follow the application instructions carefully. These sprays can help combat the fungal disease and protect new growth from becoming infected.
Effectiveness of Antifungal Sprays
When faced with the challenge of treating and preventing hydrangea spots, antifungal sprays are often recommended as a viable solution. These sprays contain chemicals that effectively combat fungal infections, which are a common cause of leaf spots on hydrangeas. However, it is important to understand the effectiveness and proper usage of antifungal sprays to ensure successful treatment.
Antifungal sprays work by targeting and eliminating the fungi responsible for causing leaf spots on hydrangeas. They contain active ingredients such as copper-based compounds or organic fungicides that inhibit fungal growth and prevent further damage to the plant. When used correctly, these sprays can effectively control and eradicate fungal infections.
It is crucial to carefully read and follow the instructions provided by the manufacturer when using antifungal sprays. Proper application techniques include thoroughly spraying the foliage, focusing on both the upper and lower surfaces of the leaves. It is also recommended to apply the spray during periods of dry weather to enhance its effectiveness.
For example, suppose you notice early signs of leaf spots on your hydrangeas. To effectively treat this issue, you decide to use an antifungal spray. Following the instructions provided, you diligently spray your plants every two weeks during dry periods, ensuring complete coverage of the foliage. Over time, you observe a significant reduction in leaf spots, indicating that the antifungal spray has been effective in combating the fungal infection.
While antifungal sprays can be highly effective in treating leaf spots on hydrangeas, it is important to note that they are not a cure-all solution. It is essential to address any underlying causes contributing to the fungal infection, such as poor drainage or overcrowding. Additionally, practicing good cultural practices like regular pruning, adequate spacing between plants, and proper watering can help prevent future occurrences of leaf spots.
Having understood the effectiveness of antifungal sprays as a treatment option, let’s now explore the importance of regular maintenance in keeping hydrangeas healthy and resilient.
Regular Maintenance for Healthy Hydrangeas
Maintaining healthy hydrangeas requires consistent care and attention. By implementing regular maintenance practices, you can promote plant vigor, reduce the risk of diseases, and enhance the overall beauty of your hydrangea garden. Let’s delve into some key aspects of regular maintenance for healthy hydrangeas.
Think of regular maintenance for hydrangeas like tending to a cherished garden. Just as we nurture our plants with care, providing them with adequate water, sunlight, and nutrients, regular maintenance involves similar principles to ensure the health and vitality of hydrangeas.
One important aspect of regular maintenance is proper watering. Hydrangeas have specific watering needs and can suffer from both under-watering and over-watering. To maintain a proper balance, consistently monitor the moisture levels in the soil and water accordingly. The goal is to keep the soil evenly moist but not waterlogged. Avoid excessive watering during periods of high humidity or heavy rainfall as this can promote fungal infections.
For instance, suppose you notice that your hydrangea’s soil is drying out too quickly due to hot weather conditions. To combat this issue, you increase the frequency of your watering routine to ensure that the soil remains consistently moist but not saturated. As a result, you observe healthier foliage and vibrant blooms on your hydrangeas.
In addition to watering, regular fertilization is crucial for providing essential nutrients to sustain healthy growth. Use a balanced slow-release fertilizer formulated specifically for hydrangeas and apply it according to the package instructions. A well-nourished plant will have stronger resistance against disease and pests.
This disease rarely kills the plant, but it does affect flower budding. Remove diseased leaves and throw in trash. DO NOT LEAVE DISEASED LEAVES IN GARDEN. Spray regularly with Daconil fungicide. This will only stop spreading but not cure it.
WE ARE HERE TO HELP YOU HAVE A BEAUTIFUL LANDSCAPE
Any questions please give Mario a call at (504)415-1438
Clean Cut Landscape Co.
New Orleans and Metairie Landscape Plant Professionals